So technically I did these in a hospital room proper. Sis had been admitted by this point and since I was the designated overnight watch, enter felt leaves and flowers.
My inspiration were these little roses, this looped up flower from Infarrently Creative and the straight cut version. I also found these really neat leave headbands J Market sells on her Etsy shop.
I started with the leaves and found that I preferred the more narrow (orange) version. I so love the combination of felt and a plain stitch with embroidery floss. It was as simple as cutting the base, a few leave shapes, and then sewing them on. Easy peasy.
Next came the roses and yet again, I preferred the smaller orange version. Instead of sewing these I hooked up the hot glue gun. We were in a room after all and I had my hot glue gun of course. I followed the tutorial and despite having to fold the bigger yellow one over several times, I really like the result.
My favorite out of the bunch though had to be these little beauties. They were super simple and with some hot glue in lieu of the heat tape, felt and scissors they take no time at all. Mom's favorite was the tri-color little one in the center of the photo which was even easier - same technique, no fold and honestly, it was made out of the leftover scraps from the other flowers.
Now, what to do with them. I'm open to ideas. Hair bow, wreath decoration, scarf pin? Yea, no clue here.
Monday, November 21, 2011
Sunday, November 20, 2011
[make] waiting room crafts - part 1
I recently spent a great deal of time in a hospital waiting room. My sister had a scheduled surgery, so I came prepared with a bag of what I hoped could keep me occupied for at least eight hour stretch. I started with pom poms because I had seen these super cute pom flowers on Pinterest.
I tried the fork version to no avail (the baby teal ones pictured below). Either I put too much yarn or I didn't get it tied tightly enough. They came out all sideways and weird. So then I went to the hand method, also pinned, but then they were loosey goosey and so again, craft fail (more weird but larger teal ones). At this point I've gathered the attention of my mother, brother, father and niece who are all giving me advice on what I'm doing wrong. This is not to mention the rest of the people in the waiting room and the fact that I've commandeered the waiting room trash can. So because "she said so", I tried Mom's version.
(1) The piece of "tying" yarn is threaded between your middle and ring finger and then them you close your hand tightly and (2) wrap until you can't feel the ends of your fingers anymore from lack of circulation. (3) Tie off the yarn in the middle as tight as you can, wrap the yarn around and tie it one more time for good measure and then (4) cut the ends. Trim and trim some more.
So Mom as usual, completely and utterly correct - see the nice shaped cream colored poms? I guess you should trust the person who made all those pom poms for your skates so many years ago. Now to put them on stems for my flowers! I did pack my glue gun but I finished up the pom flowers when I got back home with these results.
Thanks Mom!!
I tried the fork version to no avail (the baby teal ones pictured below). Either I put too much yarn or I didn't get it tied tightly enough. They came out all sideways and weird. So then I went to the hand method, also pinned, but then they were loosey goosey and so again, craft fail (more weird but larger teal ones). At this point I've gathered the attention of my mother, brother, father and niece who are all giving me advice on what I'm doing wrong. This is not to mention the rest of the people in the waiting room and the fact that I've commandeered the waiting room trash can. So because "she said so", I tried Mom's version.
(1) The piece of "tying" yarn is threaded between your middle and ring finger and then them you close your hand tightly and (2) wrap until you can't feel the ends of your fingers anymore from lack of circulation. (3) Tie off the yarn in the middle as tight as you can, wrap the yarn around and tie it one more time for good measure and then (4) cut the ends. Trim and trim some more.
So Mom as usual, completely and utterly correct - see the nice shaped cream colored poms? I guess you should trust the person who made all those pom poms for your skates so many years ago. Now to put them on stems for my flowers! I did pack my glue gun but I finished up the pom flowers when I got back home with these results.
Thanks Mom!!
Tuesday, November 8, 2011
[learn] igloos and ice cream
I suppose the weather lends itself more to igloos than ice cream right now, but they both start with the Letter I so why not? Here are some ideas for the upcoming lesson.
All these nice images have been pinned on my twinbop board, so for links on these and more ideas check me out on Pinterest.
Friday, November 4, 2011
[celebrate] red wolf farms
Red Wolf Farms is a working family farm located in Maiden, North Carolina which opens once a year to the public in the fall. It just happens to be sort of across the woods from our house. So naturally, it's one of our favorite and by far the most convenient fall activities.
The farm has become one of our favorite pumpkin patches and they made lots of improvements this year. The corn maze was bigger and better. Not only were there chickens, but you were able to go in the enclosure this year. And, they added the cutest little calves to the pigs and goats.
Two more giant tubs of grain added to the corn "pools" which my kids LOVED jumping around in. I will make a suggestion here though, some of that grain is going to come home with you so you may want to double check pockets and socks before you stick their clothes in the washer!
A giant wooden pirate ship was added to the playground along with a neat helicopter and airplane. Everyone thought the ship was awesome.
Of course we walked down the trail to the creek this year, too. Oh, did I mention pumpkins?
We got some of those too with a ride up and back on a very nice trailer pulled by the nicest gentlemen. It's a great place to visit and definitely something to add to your Fall to do list come October.
The farm has become one of our favorite pumpkin patches and they made lots of improvements this year. The corn maze was bigger and better. Not only were there chickens, but you were able to go in the enclosure this year. And, they added the cutest little calves to the pigs and goats.
Two more giant tubs of grain added to the corn "pools" which my kids LOVED jumping around in. I will make a suggestion here though, some of that grain is going to come home with you so you may want to double check pockets and socks before you stick their clothes in the washer!
A giant wooden pirate ship was added to the playground along with a neat helicopter and airplane. Everyone thought the ship was awesome.
Of course we walked down the trail to the creek this year, too. Oh, did I mention pumpkins?
We got some of those too with a ride up and back on a very nice trailer pulled by the nicest gentlemen. It's a great place to visit and definitely something to add to your Fall to do list come October.
Wednesday, November 2, 2011
[make] scrappy skirts
I found this scrappy skirt on Pinterest and my Halloween costume plans for the twins took a very sudden turn from girlie robot to rockin' cowgirl. First I found the boots at Target. Pink. I was going for brown, but the girls voted pink. They always vote pink.
Now to raid my fabric bins. Since the boots were a pretty rosy pink, might as well go shabby chic.
The cutting begins. I really dislike measuring so I let the fabric do the work for me. I folded the fabric in half, selvage sides meeting and started strips 1" to 2" wide. I cut those in half at the fold. So, if my math is correct, on 48" fabric, my pieces were approximately 24" long by 1" to 2" wide. I angled each end and cut all the strips with pinking shears.
Step 1, basically cut a lot of strips.
Step 2, the elastic. A length that fit around my little one's waist sewn together at the ends to form a circlular waist band.
Steps 3 and 4, tying the strips on. Just like with other tutu tutorials, I simply folded the strips in half and slid the two end over the elastic and through the loop made at the fold to secure them to the elastic. Repeat and repeat and repeat. I used five different fabrics and tried to scatter them randomly around the elastic band.
Step 5, tying the final fabric. I used was a very lightweight cotton. These I tied in a simple knot, just like in the Ten Minute Tutu, to make the skirt a little fuller and to fill in the holes.
The twins love it and it has such a different look than the standard tulle tutu. A couple of notes to keep in mind.
1) The heavier the weight of the fabric, the thicker the knot around the elastic is going to be.
2) The elastic is going to stretch a lot more while you are tieing the knots than with tulle. Apparently the cotton doesn't let the elastic slide through as easily which meant I had to add a fabric strip laced around the knots to tighten the skirt a bit and make sure it didn't fall off the twin's hips.
3) To give the skirt a little more length but not have to cut your fabric different you can just vary the lengths of your ends. In other words instead of folding the fabric in half and knotting it, you can fold it off centered and not only get some more length but make the skirt a little fuller with the varied lengths of your ends.
To complete the outfits, I added some suede roses that I picked up at the Dollar Store to a natural straw cowboy hat. Then I cut out two 24" x 24" squares for the bandanas out of some of the leftover fabric from the skirts and two cowgirl costumes are done.
The cost? $22 each for the pink boots at Target, $6 each for the hats also at Target, $2 for the suede roses and fabric that I had in my stores. Since I figure the girls would have gotten a pair of boots this season anyway, I'm claiming that the girls' costumes only cost me $7 each. Not too shabby, just shabby enough.
I'd love to see your versions if you give it a try and maybe you will even get a little help like I did. The little monster that happens to be in all my tutorial photos is my new "helper" according the the girls. The twins help a lot with cutting and "sewing" my scraps but apparently the little monster is the scrappy skirt spokesperson.

Thanks to Sherry, Katie, Erin and Ana for hosting the fall edition!
Now to raid my fabric bins. Since the boots were a pretty rosy pink, might as well go shabby chic.
The cutting begins. I really dislike measuring so I let the fabric do the work for me. I folded the fabric in half, selvage sides meeting and started strips 1" to 2" wide. I cut those in half at the fold. So, if my math is correct, on 48" fabric, my pieces were approximately 24" long by 1" to 2" wide. I angled each end and cut all the strips with pinking shears.
Step 1, basically cut a lot of strips.
Steps 3 and 4, tying the strips on. Just like with other tutu tutorials, I simply folded the strips in half and slid the two end over the elastic and through the loop made at the fold to secure them to the elastic. Repeat and repeat and repeat. I used five different fabrics and tried to scatter them randomly around the elastic band.
Step 5, tying the final fabric. I used was a very lightweight cotton. These I tied in a simple knot, just like in the Ten Minute Tutu, to make the skirt a little fuller and to fill in the holes.
The twins love it and it has such a different look than the standard tulle tutu. A couple of notes to keep in mind.
1) The heavier the weight of the fabric, the thicker the knot around the elastic is going to be.
2) The elastic is going to stretch a lot more while you are tieing the knots than with tulle. Apparently the cotton doesn't let the elastic slide through as easily which meant I had to add a fabric strip laced around the knots to tighten the skirt a bit and make sure it didn't fall off the twin's hips.
3) To give the skirt a little more length but not have to cut your fabric different you can just vary the lengths of your ends. In other words instead of folding the fabric in half and knotting it, you can fold it off centered and not only get some more length but make the skirt a little fuller with the varied lengths of your ends.
To complete the outfits, I added some suede roses that I picked up at the Dollar Store to a natural straw cowboy hat. Then I cut out two 24" x 24" squares for the bandanas out of some of the leftover fabric from the skirts and two cowgirl costumes are done.
The cost? $22 each for the pink boots at Target, $6 each for the hats also at Target, $2 for the suede roses and fabric that I had in my stores. Since I figure the girls would have gotten a pair of boots this season anyway, I'm claiming that the girls' costumes only cost me $7 each. Not too shabby, just shabby enough.
I'd love to see your versions if you give it a try and maybe you will even get a little help like I did. The little monster that happens to be in all my tutorial photos is my new "helper" according the the girls. The twins help a lot with cutting and "sewing" my scraps but apparently the little monster is the scrappy skirt spokesperson.
Thanks to Sherry, Katie, Erin and Ana for hosting the fall edition!
Tuesday, November 1, 2011
[learn] halloween fun
We kind of learned. Does talking about the letter H count? Okay, we probably celebrated a little more learned but we did cook and craft. We started with snacks to eat while we watched It's the Great Pumpkin Charlie Brown.
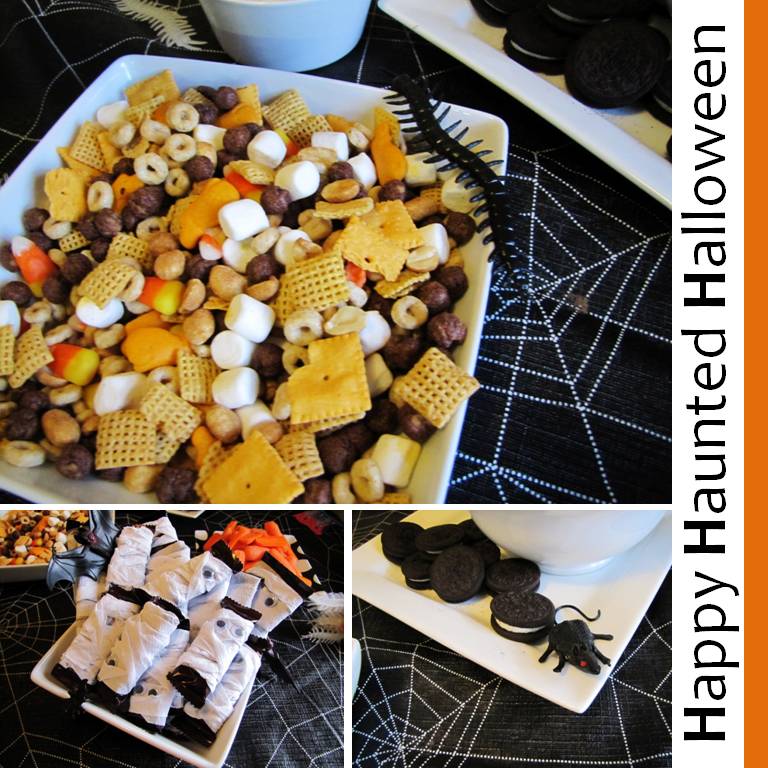
Trail mix is always super fun with the kids. We used this mix from Munchkin Munchies as a starting point and put our own twist on it. The key ingredients were Honey Nut Chex cereal, Honey Nut Cherrios, Cocoa Puffs, honey roasted peanuts, mini marshmallows, Cheeze-Its, and candy corn. We threw some goldfish in there because we wanted to and they were orange. It's a great mix and I was especially surprised at the Cocoa Puffs. I'm not a big fan of the cereal but added to the trail mix, it was great! Then came candy proper in the form of Hersheys chocolate mummies and Blow Pop ghosts that doubled as treats for the kids classmates.
We also made the ghost lights pinned earlier out of paper cups, google eyes, and some twinkle lights. The idea is a great one from All You and you could make so many variations from ghosts with just a little more effort. I think next time we will stick with one light per cup though because otherwise it makes the string of lights get very short, very quickly. Then it was time for clay. I stole the white clay and made some ghosties with black brads for eyes.
The kids were much more creative. Jack's is a halloween gnome of some sort and I'm not honestly sure what the girls were.
Then it was time for Trick or Treating. Jack was a tropical chimp and the twins were cowgirls. Artic cowgirls thanks to the temperature dropping 40 degrees in less than two days.
Downtown Maiden and the churches on Main Street do a wonderful job on Halloween. The streets close down and between Trunk or Treats and Halloween Festivals you will get all the candy you want. Not to mention that you can go house to house too, almost all of which are decorated.
So maybe this lesson was as much of a lesson as it was a party, but we still have lots and lots of fun. Happy Halloween!
Now onto the letter I. I'm thinking ice cream although igloo may be more appropriate with our current weather conditions.
Trail mix is always super fun with the kids. We used this mix from Munchkin Munchies as a starting point and put our own twist on it. The key ingredients were Honey Nut Chex cereal, Honey Nut Cherrios, Cocoa Puffs, honey roasted peanuts, mini marshmallows, Cheeze-Its, and candy corn. We threw some goldfish in there because we wanted to and they were orange. It's a great mix and I was especially surprised at the Cocoa Puffs. I'm not a big fan of the cereal but added to the trail mix, it was great! Then came candy proper in the form of Hersheys chocolate mummies and Blow Pop ghosts that doubled as treats for the kids classmates.
We also made the ghost lights pinned earlier out of paper cups, google eyes, and some twinkle lights. The idea is a great one from All You and you could make so many variations from ghosts with just a little more effort. I think next time we will stick with one light per cup though because otherwise it makes the string of lights get very short, very quickly. Then it was time for clay. I stole the white clay and made some ghosties with black brads for eyes.
The kids were much more creative. Jack's is a halloween gnome of some sort and I'm not honestly sure what the girls were.
Then it was time for Trick or Treating. Jack was a tropical chimp and the twins were cowgirls. Artic cowgirls thanks to the temperature dropping 40 degrees in less than two days.
Downtown Maiden and the churches on Main Street do a wonderful job on Halloween. The streets close down and between Trunk or Treats and Halloween Festivals you will get all the candy you want. Not to mention that you can go house to house too, almost all of which are decorated.
So maybe this lesson was as much of a lesson as it was a party, but we still have lots and lots of fun. Happy Halloween!
Now onto the letter I. I'm thinking ice cream although igloo may be more appropriate with our current weather conditions.
Saturday, October 29, 2011
[make] mini-mummies and sticky ghosts
Super easy and super quick, there's no need to stray too far from the classics.
Mummies and Mini-Mummies:
Directions: Glue the end of some white crepe paper to the candy bar wrapper (I used Hershey Bars) and simply wrap. Wrap the crepe paper around until it's all covered and then tear the paper and glue the end to the bar's wrapper. Glue on some google eyes and move on to the next one.
Blow-Pop Ghosties:
Directions: Take a single tissue and center the sucker in the middle. Fold the tissue around the pop part and tie off with a ribbon. I opted to go with black yarn to tie secure the tissue to keep it retro. Use a black marker to may eyes and a mouth if you'd like.
The great part about both of these - the kiddies can help you assemble and make the faces. Especially if you are trying to put 50+ of each together! Add them to a clear bag with a fruit roll-up and a ribbon and ready to give.
Mummies and Mini-Mummies:
Directions: Glue the end of some white crepe paper to the candy bar wrapper (I used Hershey Bars) and simply wrap. Wrap the crepe paper around until it's all covered and then tear the paper and glue the end to the bar's wrapper. Glue on some google eyes and move on to the next one.
Blow-Pop Ghosties:
Directions: Take a single tissue and center the sucker in the middle. Fold the tissue around the pop part and tie off with a ribbon. I opted to go with black yarn to tie secure the tissue to keep it retro. Use a black marker to may eyes and a mouth if you'd like.
The great part about both of these - the kiddies can help you assemble and make the faces. Especially if you are trying to put 50+ of each together! Add them to a clear bag with a fruit roll-up and a ribbon and ready to give.
Friday, October 28, 2011
[learn] happy haunted halloween
It's so convenient that the next letter is 'H'!
There are more crafts and less materials this week but here are some links all the same.
1 - It's the Great Pumpkin Charlie Brown
2 - Halloween Coloring Book
3 - Cotton Swab Skeleton
4 - Pumpkin Candy Toss
Stayed tuned for more spooky crafts and snacks.
There are more crafts and less materials this week but here are some links all the same.
1 - It's the Great Pumpkin Charlie Brown
2 - Halloween Coloring Book
3 - Cotton Swab Skeleton
4 - Pumpkin Candy Toss
Stayed tuned for more spooky crafts and snacks.
[make] scary fun
Nothing like waiting to the last minute. Some Halloween inspiration:
All the images and ideas along with lots of others can be found on my Scary Fun board via Pinterest. Do you have holiday boards full of so many ideas that you would never be able to do all of them?
Thursday, October 27, 2011
[learn] green grass and growing caterpillars
Here is a little break from the pumpkin barrage. We squeezed in a little learning in all our fall fun and it was all about the letter 'G'. That and cutting up things. We started with The Very Hungry Caterpillar by Eric Carle.
The girls loved the story and were excited making their own pom pom caterpillars and paper leaves for them to eat inspired by these invites via Pottery Barn Kids.
Next we started on our What's Growing in the Grass activity sheet. Jack took right to the cutting, the girls weren't quite as effective. It was more of an earth's crust being forced out from under the girls bugs rather than hiding in the nice tall grass.
Last but not least, butterflies to fly above our grass cupcakes. Maddie never lets me get a photo of the cupcakes before she digs in so use your imagination. They were inspired by these found via Pinterest.
Now for the next lesson on the letter 'H'. Oh, and isn't it convenient that it's just about Halloween?
Subscribe to:
Posts (Atom)