Wednesday, September 28, 2011

[make] ten minute tutu

In my household, tutus are a priority.  And when you need a tutu, you need it quick.  You also need two of them.  Enter the Ten Minute Tutu.

Materials:

elastic (measured to fit your little one's waist)
two safety pins
tulle and lots of it (6 yards is a good start for a size 6)
scissors

First make your elastic into a loop and double pin your ends together, crossing your pins for extra stability.  Little girls don't like to get stuck with pins while twirling.  Trust me. 

Now the tulle.  In 10 minutes you don't have time to cut a 1000 little strips of tulle, so this was my technique. Grab the tulle and bunch it together (like you are forming a tulle tube), gather it together and cut it approximately every half yard.  I ended up with 12 pieces tulle from 6 yards the full width of my bolt still folded in half.  


Then take those rectangles and gather them in the center.  This will in effect give you the bolt width of the tulle instead of your half yard.   

Here comes the hard part, tie them in a knot onto your elastic.  Yep, that's it.  Just tie a single knot in each piece of tulle equidistant around your elastic.  

DONE!  (Unless you have multiple little girls and then REPEAT.)

Now, I state this disclaimer on what you've just read:  this is not a permanent sort of deal.  This is a tutu that can be assembled and disassembled quickly and will work for a little one to run about in and play.  It's not designed to withstand a Halloween marathon, a dance recital, or be handed down as a family heirloom. I will say, it did withstand my ruffians playing in it an entire day outside and Week 2 of TwinBop!


Let me know if you try it and what you think! 


Monday, September 26, 2011

[live] butterflies and rainbows

We found out our second child would be our second AND third child.  We were told to have the nursery done by 20 weeks because odds were I would be in bed for the second half of the pregnancy.  Planning a nursery for two with three possible combos? So we opted for red and blue, Ikea style, and hoped for the best.  The nursery was done well in anticipation of Week 20 and the ultrasound to see whether there would be khakis or dresses or both in our future.  Two girls, two little girls living in bright red and royal blue.

I was blessed, I worked the Thursday before my water broke Friday morning, albeit three and half weeks early. I brought two beautiful little girls home in pink from head to toe days later.  They didn't care whether their nursery was red and blue but the pink and lavender gradually worked its way in to the decor.  Not many princesses wear the same colors as the Duke Basketball team.

So now almost four years later (and months after the original idea board) it's back to red and blue, but I didn't forget pink this time, or rainbows or butterflies or flowers or anything absolutely girltastic!  I started with a blank slate and some bedding courtesy of JuJu:


Enter 100+ butterflies hand cut from Martha's templates and stapled to the wall with a standard stapler (which I found to be the quickest and most efficient method).  UPDATE:  The butterfly template I used was Martha Stewart's Butterfly Patch Template found here:  http://www.marthastewart.com/267070/butterfly-patch-shirt. This gave me three size options and was a much simpler template than some of Martha's others.

Maddie's side on the right just like I carried her:

Kate's on the left not forgetting their piggy banks and rugs from their original nursery:

And some tissue paper flowers to inspire the butterflies:

I'm still working on the closet and some additional artwork to finish the room out.  Then onto Jack's.

Thanks to Rachel at One Pretty Thing for featuring this post!

Sunday, September 25, 2011

[make] rick-rack roses

I learned a new word, sianinha.  Apparently it's the spanish equivalent to our rick-rack, a product I love.  So when I saw this pin and Trocas de Linhas beautiful tutorial on flor de sianinhas I knew I had to try it.  I didn't follow her tutorial to the letter but my flowers turned out beautifully.  


I started with yellow rick-rack in medium (3/4").  For my first flower I went with a total length of 50", doubled and woven together.  Then instead of using a needle and thread I opted for my handy, dandy, hot glue gun.  I glued the ends together and then started rolling the rick-rack into a little ball.  Then I simply hot-glued the end to the bottom of the "flower bud" and covered the bottom with an even layer of hot glue.  While it was still a little tacky but mostly cooled, I pressed the bottom of the flower onto my work table and made sure all the layers of rick-rack were secured together.

This is where the magic happens.  You just run your fingers over the top and the "petals" start folding down.  It really is something.  The next thing I knew I had this really pretty little yellow rose.  I tried it again with a shorter length, which is probably key with these roses to get the right portion.

Not pictured (yet) is a red rose which was made with extra-large rick-rack and if I had had a little more in the way of length would be my favorite.  Now to go out and get more rick-rack.

Friday, September 16, 2011

Thursday, September 15, 2011

[make] week 3: felt finger puppets

For Week 2, I was focusing on Horton Hatches the Egg.  There are not that many characters, so why not puppets?  Even better, felt finger puppets that can be made in an evening.

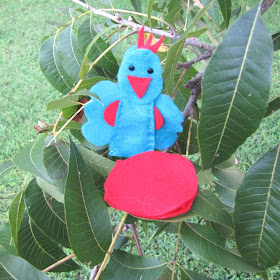
Hello Clementine inspired the elephant and I found this little baby elephant on Flickr.  An interpretation of this little chick created Mayzie and the egg, well it's a couple of ovals.  As for colors, I tried to match the original Horton Hatches the Egg book and used grey for Horton and his little Elephant Bird, red and teal for Mayzie and red for the egg.


I quickly realized after cutting all the pieces, my idea of  letting the girls assemble and glue the finger puppets together would be super time consuming. If you are braver than I am, feel free.  Either way, some directions for assembly.


For Horton:

Sew the base shapes together with the stitch of your choosing leaving an opening at the bottom.  I used a simple running stitch and matching embroidery thread. Use black embroidery thread to make his trunk creases.  Insert his brad eyes on the front.  Glue Horton's face to the rectangle base, glue his ears in place on the back of his face and then glue the back circle to his face, his ears and the rectangle base.


For Mayzie:

Insert the wings and wing accents into the base on each side.  Sew the base shapes together with the running stitch leaving the bottom open.  Insert her eyes and glue her beak onto her face.  Glue her feathers the the top of her head and glue her face to the base.  Glue the other oval on the back of her face and on the base.  The base should be sandwiched between the two ovals.  Glue her tail feathers to the lower portion of the back base.

For the Egg:

Sew the base shapes together leaving an opening at the bottom.   Glue one oval to each side of the base and to each other.


For Baby Elephant Bird:

Sew the three sides of the base shapes together leaving an opening at the bottom.   Insert an eye on each side of the baby elephant bird.   Glue one body piece to the base, insert and glue the tail and then glue the other body side to the base so that they match.  Glue an ear and a wing on each side of the elephant bodies again trying to locate them in approximately the same place on each side.

All done.  As for any additional tips, on all the bases except for Mayzie's, if you choose to use a machine for your sewing, I would suggest tracing and sewing your bases together before cutting them out of the felt. Mayzie's base has the wings inserted into it so it will have to be cut out prior.

Also, I started using fabric glue and ended up switching to hot glue.  Obviously if you have children assembling these, fabric glue would be the way to go.  Just be warned it's going to take a while to dry and can be frustrating especially with over two layers like with Mayzie's top head feathers.  With hot glue, it's instant gratification and I'm ALL about that, so that's my preferred method.

I hoped you enjoyed my take on felt finger puppets and please let me know if you try it.  If you are interested in my patterns I will be happy to share, just leave me a comment!

Wednesday, September 14, 2011

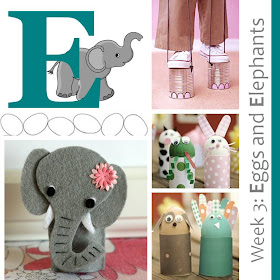
[learn] week 3: elephants and eggs

This week the girls learned about the letter E.  I learned that it's harder to locate vintage copies of Horton Hatches the Egg than you think and that brown eggs plus food coloring equals beautiful earth tones, but completely useless colors when trying to recreate a teal bird.  Back to the girls.

We focused on the letter "E" and the hiccup with finding the Horton book ended up being a happy accident.  The girls loved the video and the sausage and broccoli trees, a strawberry egg, and deviled egg sail boats were enjoyed while they watched Horton be carried across the waves to the Circus.


In an effort to reduce the numbers of activities (and therefore the two and half hours our "class" consumed) I made the felt finger puppets ahead of time.  My favorite was the baby elephant bird, but the girls loved them all.  Mayzie sat on her egg and the baby went running over to Horton after she hatched.


Then came coloring!  We had lots of activity sheets and I so love it when the girls mirror one another.  Last but not least, dessert.  We made butterscotch nests with baby elephant bird eggs, but unfortunately they didn't make it through the photo process.

And once again it's onto the next theme.  F is a great letter, full of flowers, fruit, fish, frogs, football and FALL.  Check out my pin board and look for Week 4's posts.

Tuesday, September 13, 2011

[celebrate] fall = football

Fall is officially here. College football has started and our first game was a great opener,  Appalachian State versus Virginia Tech in Blacksburg.  Even at an away game, tailgating is required.


Amy and I planned the tailgate together, but really she did most of the work.  I mean bacon jam? Oh my goodness is that stuff amazing.  Between the baked grits with bacon jam, country ham biscuits,  fruit and cupcakes, the poor oreos were ignored despite their cute little football shape.

Thanks to Amy and all her cooking and planning.  Want to see more?  For more photos of the tailgate, the game, and the trip in general visit Amy's blog, Sadie Priss.  She's much better at documentation than I am.  I was too busy enjoying the bacon jam.

Monday, September 12, 2011

[learn] week 3: materials

Printed materials for this week has been more of a challenge.  Who knew that Horton Hatches the Egg would so difficult to get your hands on.  So instead of a story this week, we will be enjoying a video!  The links are below.


1. Horton Hatches the Egg
2. Horton Hatches the Egg (video)
3. More or Less
4. E is for Egg
5. Elephant Shapes

A post of activities and super cute accessories will be coming your way soon!

Friday, September 9, 2011

Thursday, September 8, 2011

[learn] week 2: my little dancing ducks

I really, really tried to cut down my activities.  I did!  But as it turns out, it still takes longer than you think, or at least I think.  Week 2 was a quacking, dancing, singing, learning success.  We started out with wardrobe - tutus are a must if you are going to be dancing.  The tutus were turned out in less than 15 minutes a piece from cutting to assembly.  Yeah, I will go into that later.  Time to head outside to our "classroom" and story time.

We read Ducks Don't Wear Socks by John Nedwidek.  It's an awesome book and a great read aloud.  Ducks down, now time for D is for Dancing.

Here We Go Looby Loo was okay, but the girls really got going when we played "Something That I Want"  by Grace Potter from the Tangled Soundtrack. Jack was all about some Black Eyed Peas.

Snacks made it easy for everyone to take a seat.  We had duck shaped sandwiches, assembled by the little ones, carrots, celery and ranch, grapes, and goldfish crackers all washed down with pouch juice (aka Capri Suns). Maddie takes her time enjoying her snacks so Kate and Jack got started with our worksheets while they waited and Maddie caught up later.

Next came the paint.  It really wasn't as messy as I had thought it would be.  Maddie was all about just making the "tutu" part with her hand prints. Kate's more into living on the wild side.

Then came a few more worksheets, review of "D is for ..." and working on the concept of more vs. less.  The worksheets worked great as time fillers when one kid finished before the other.

On to another story - this time with props via Picklebums. These are SUPER easy and one of the girls favorite parts.  Just little paper ducks cut out of card stock and glued onto craft sticks.  They loved counting down from five little ducks to no little ducks.

Then they needed the ducks so they could make up their own stories.

Last but not least, dessert and the quote of the day in reference to Fancy Cakes. When asked if the cakes were fancy, Katelyn replied that they were "just fancy enough."  TwinBop Week 2 is in the books and its already time for Week 3!

For more information and complete list of links on the activities and materials we used, message me or leave me a comment.  Check out my pinboard for previews of weekly themes to come!

Monday, September 5, 2011

[make] sydney's bag

Sydney turned two.  Every two year old little girl needs her very own coloring book messenger bag with coordinating crayon pouch.  Did I mention she has a removable flower pin in case she needs to mix it up?


This is one of the bags I've enjoyed making the most.  Despite the fact that it's for a beautiful little girl, the fabrics are just really pretty and the fact that you can tie the straps to fit any little person may be the only way I make straps from now on.

Thursday, September 1, 2011

[learn] week 2: materials

Week 2's lesson, D is for Dancing Ducks, is here.  These are the printed materials I'm using this week.


1. Ducks Don't Wear Socks
2. Five Little Ducks
3. Shape Maze
4. More Less
5. Number Maze

We will also be dancing to Here We Go Lobby-Loo and using the D is for Dog coloring sheet and D is for Dolphin coloring sheet. Oh and there are crafts and snacks, too!